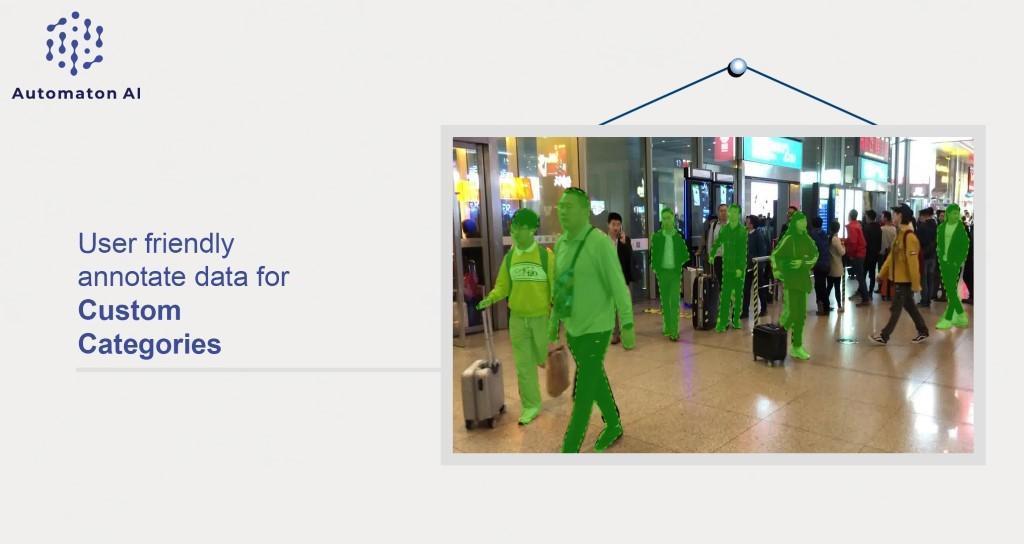
- Custom UI - Custom user interface (UI) designed specifically for the ease of manual annotation and automated labeling.
- Secure - Easy to label data, securely export data in multiple standard formats, swiftly build and train models, and integrate these models into real-time workflows.
- Models Included – ADVIT includes 10 Deep learning (DL) models which can automatically label data across more than 100 classes.
- Integration - Capable of integrating custom-trained models for annotation.
- Tool to annotate at scale: With efficient Data management for projects running simultaneously, multiple teams across departments can work concurrently to increase overall productivity.
- Enterprise Identity & Access Management: ADVIT provides identity and access management hence making it easily scalable across teams and locations. Clients can custom integrate this product as per need and make the entire process collaborative for prompt communication within the team.
- Data Support - Supports all type of data
- Image (.jpg, .jpeg, .png)
- Video (.mp4, .avi, .mov)

-
Registration:The first time you register on ADVIT, you are required to enter your username, email id, and password to register.
-
Login:
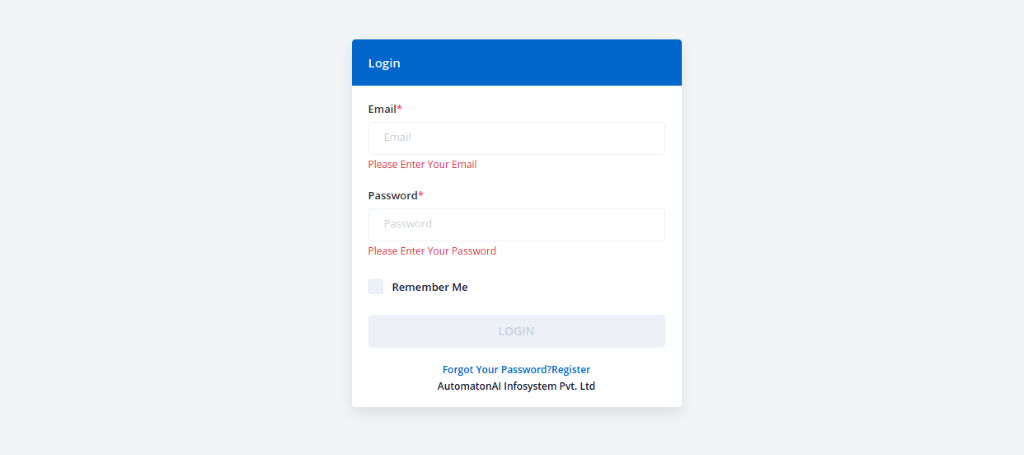
- Enter your Admin Username and Password.
- For additional security, Admin can determine which parts of the project each user has access to, and also limit the number of login attempts. By default, after six failed attempts, the account is locked and the user must wait for a few minutes before trying again.
- Locked accounts can be reset by the Admin.
-
Sign out of the ADVIT:
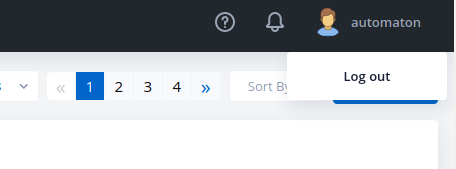
- In the upper-right corner, click the Account (Account) icon.
- Click on Log Out.
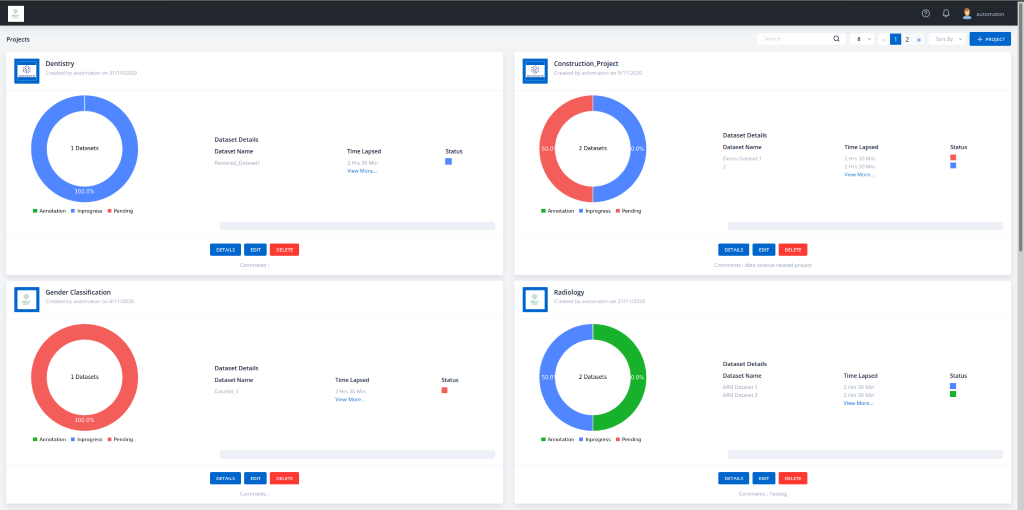
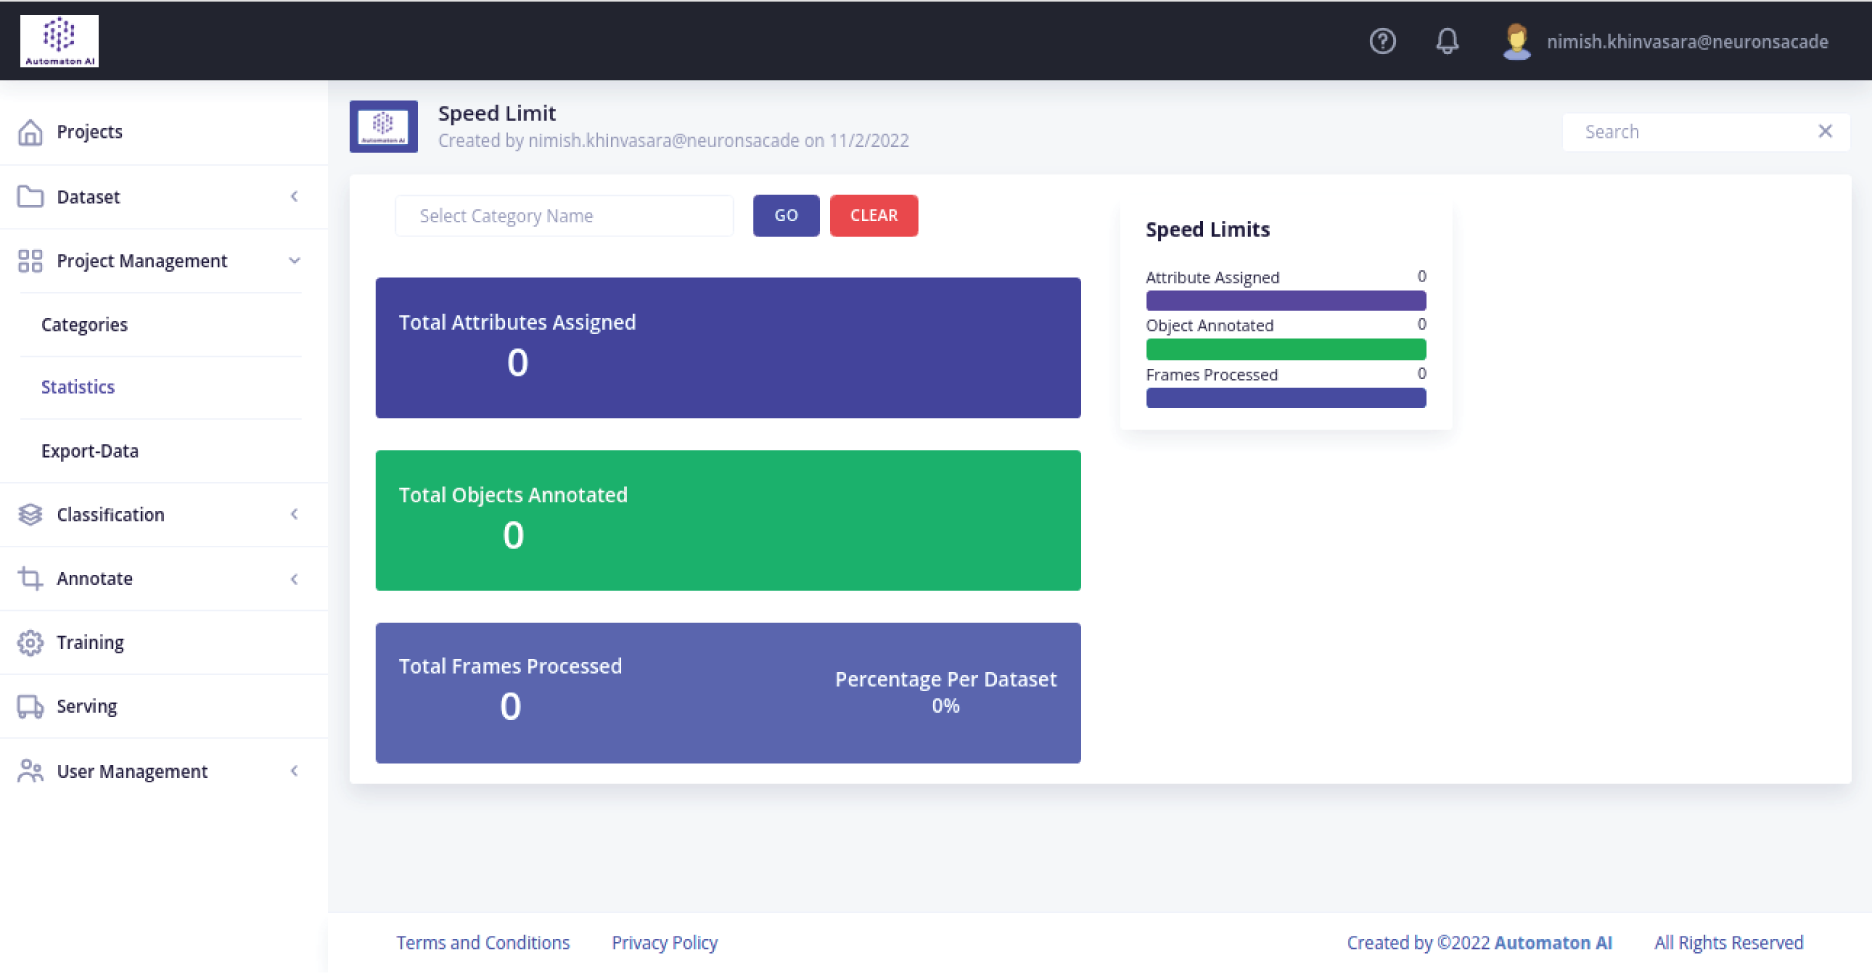
The project specifies information like
- Dataset Name
- Project Creation Date
- Time Lapsed
- Status of the Project
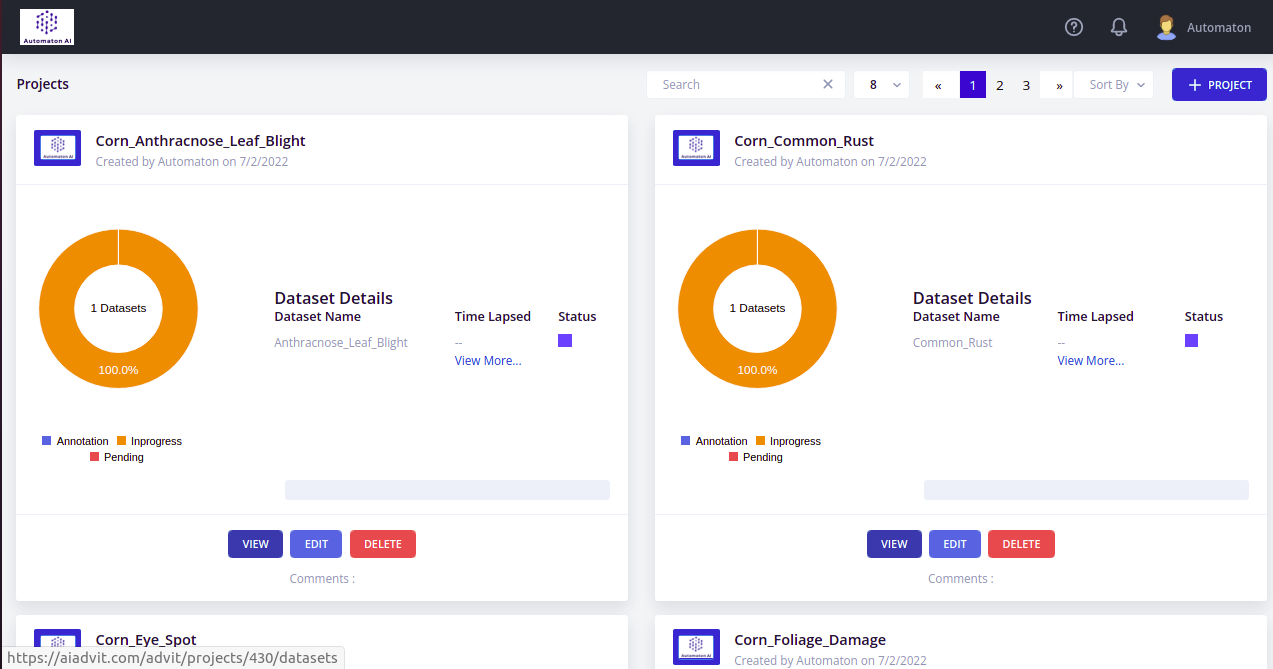
- The project summary page displays multiple projects created by the user. The dashboard summarizes the project details, completion status, and time statistics.
- A user can create, edit and delete various projects. In addition, the statistics feature of the project displays an evaluation of datasets and includes the status of the datasets as well as the time elapsed since the user created the project.
- All the projects are saved by project Id, project name with the timestamp. The user can sort the listing of projects as per requirement.
- The 'Help' icon showcases product Documentation of ADVIT and the 'Notification' icon notifies the user with regular updates.
- To add a dataset, click on the 'Dataset' button shown in the top right corner of the screen.
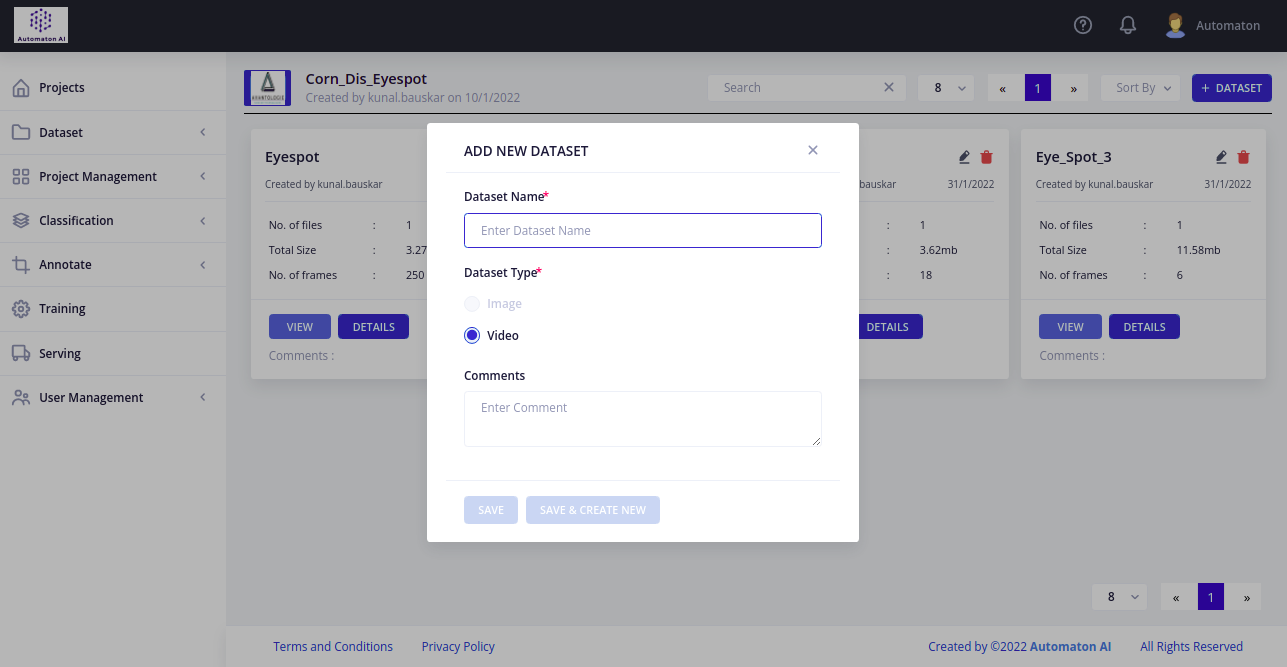
- A new window will appear as shown in the above image.
- Enter the name of the dataset as per your convenience in the 'Dataset Name' text box.
- Add your comments (if any) in the 'Comments' Text box
- Click on the 'Save' button to save the dataset or Click on 'Save & Create New' to save the current dataset and open a new window to create a new dataset.
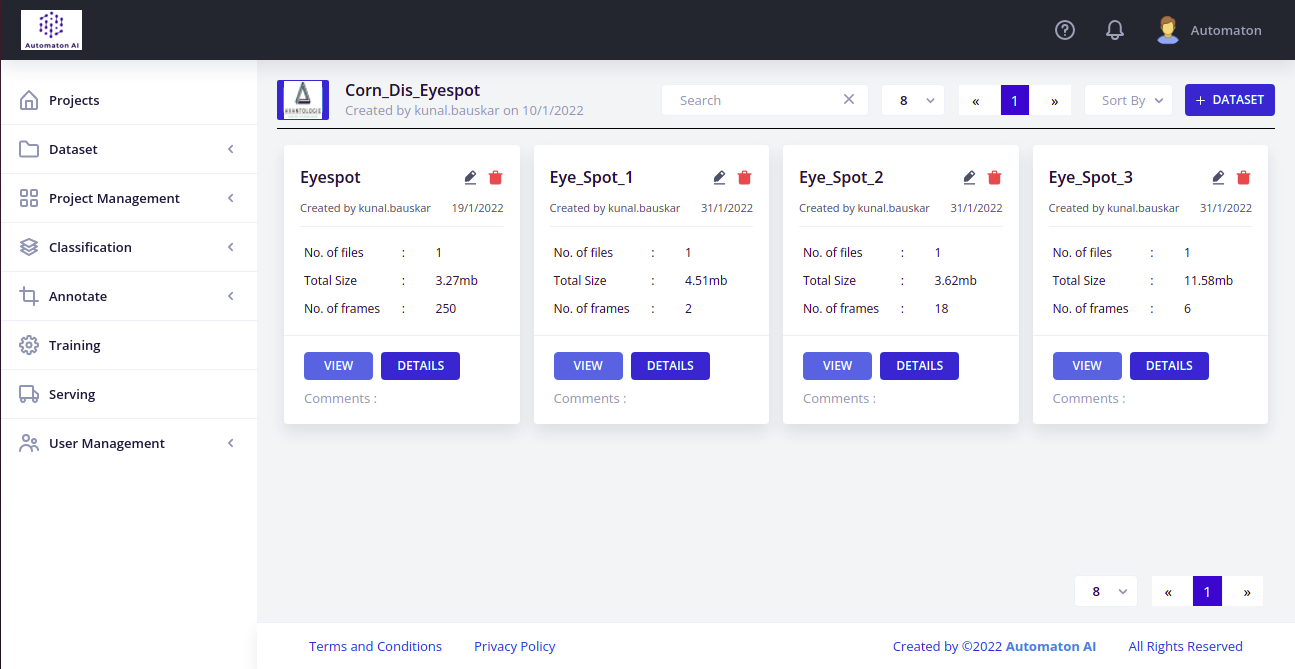
- The dataset will be created as shown in the image above. Users can add multiple datasets by following the above steps.
- One can edit the dataset details by clicking the 'Edit' Button.
- You can delete the dataset by clicking the 'Delete' Button.
- After clicking on the 'Details' button, you will be directed to a new page displaying the details of the uploaded datasets. Users can view frames of individual datasets or delete them as per requirement.
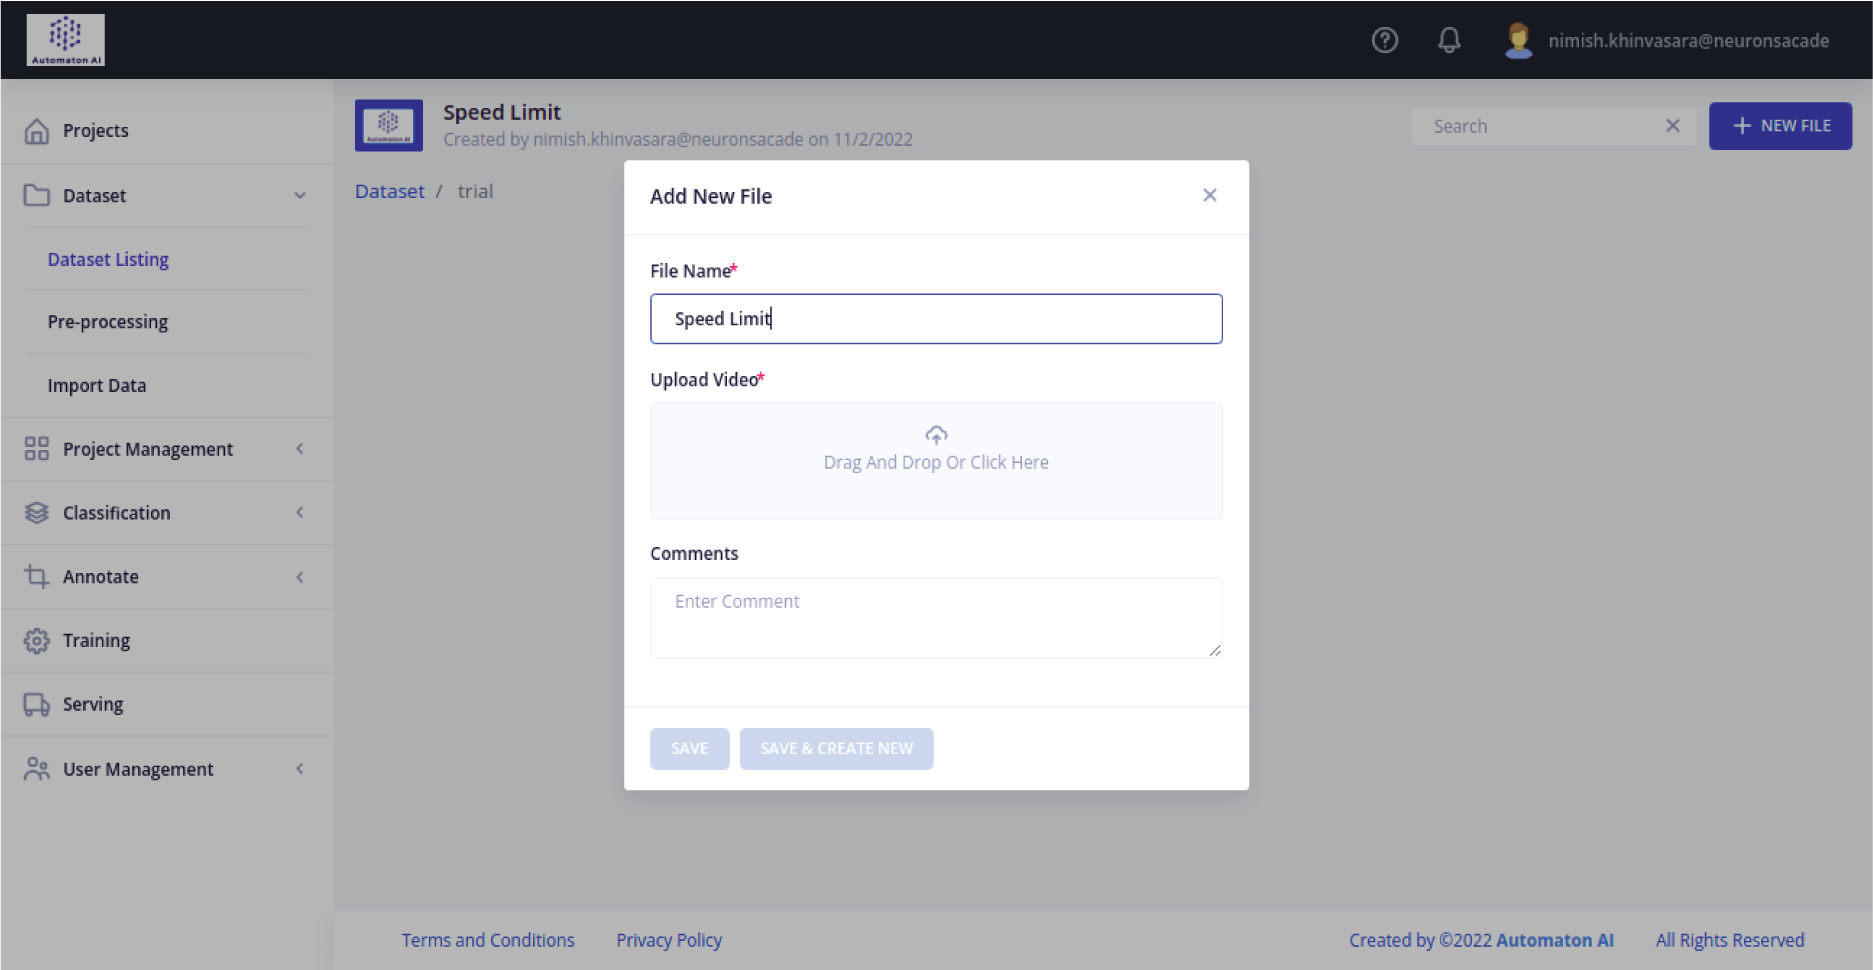
- To add files to the dataset, open the dataset you wish to upload files in and then click on the "New File” button present in the top right corner and a new window will be displayed.
- Enter the name of the file as your choice in the 'File Name' text box.
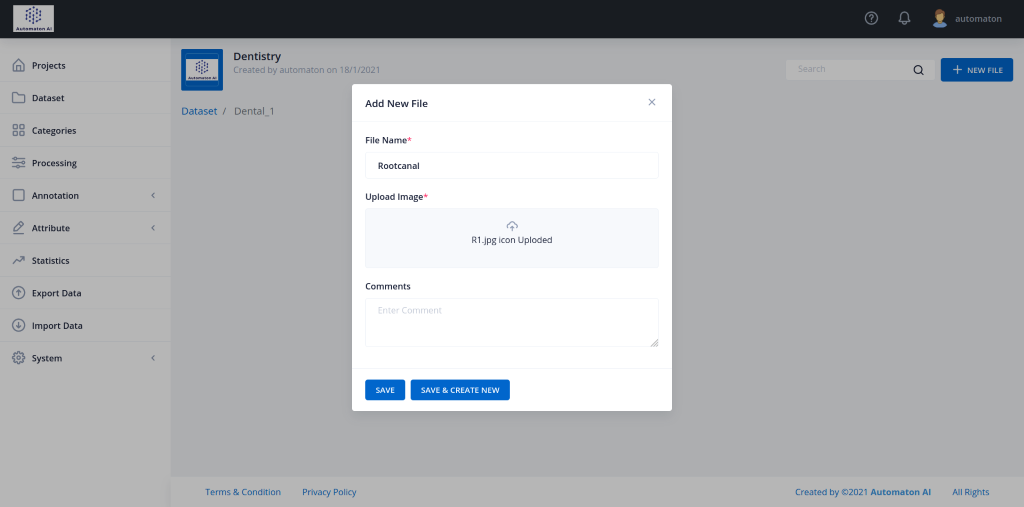
- Upload the video file by dragging the file directly to the 'Upload Video' option or selecting the file from the directory.
- Add desired comments to the 'Comments' text box if any
- Click on the 'Save' button to save the file or click on 'Save & Create New' to save the file and display a new window to create a new file
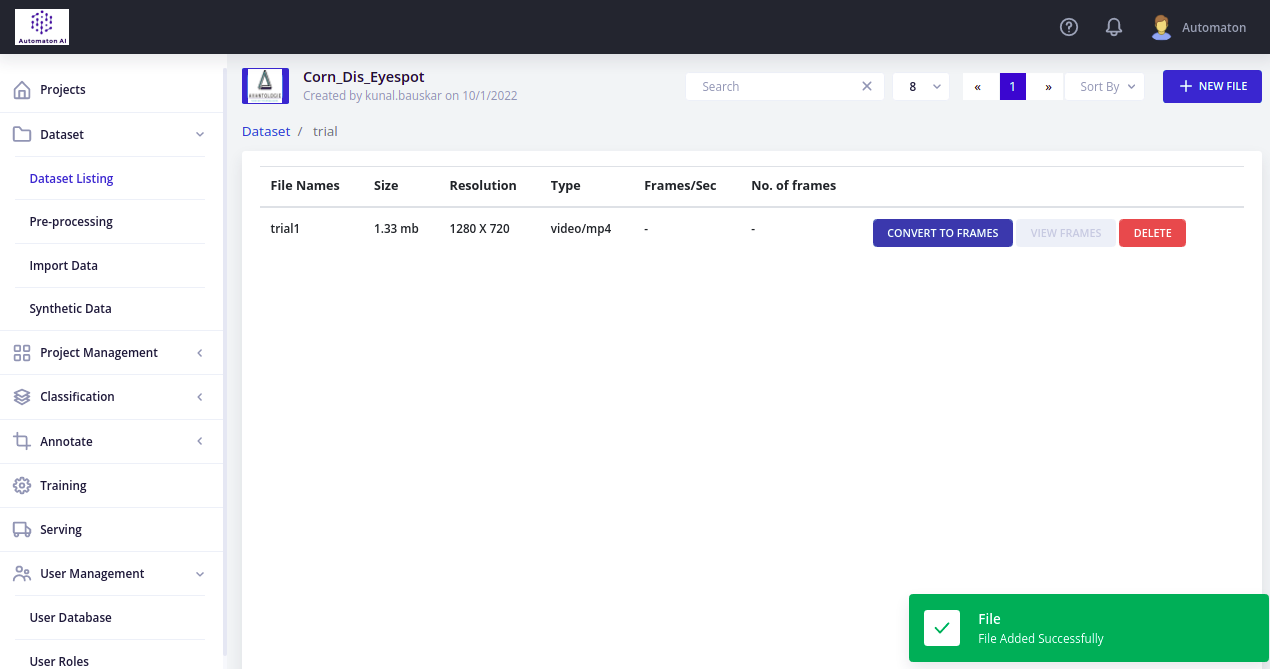
- After clicking on the 'Save' button the user is notified with a success message.
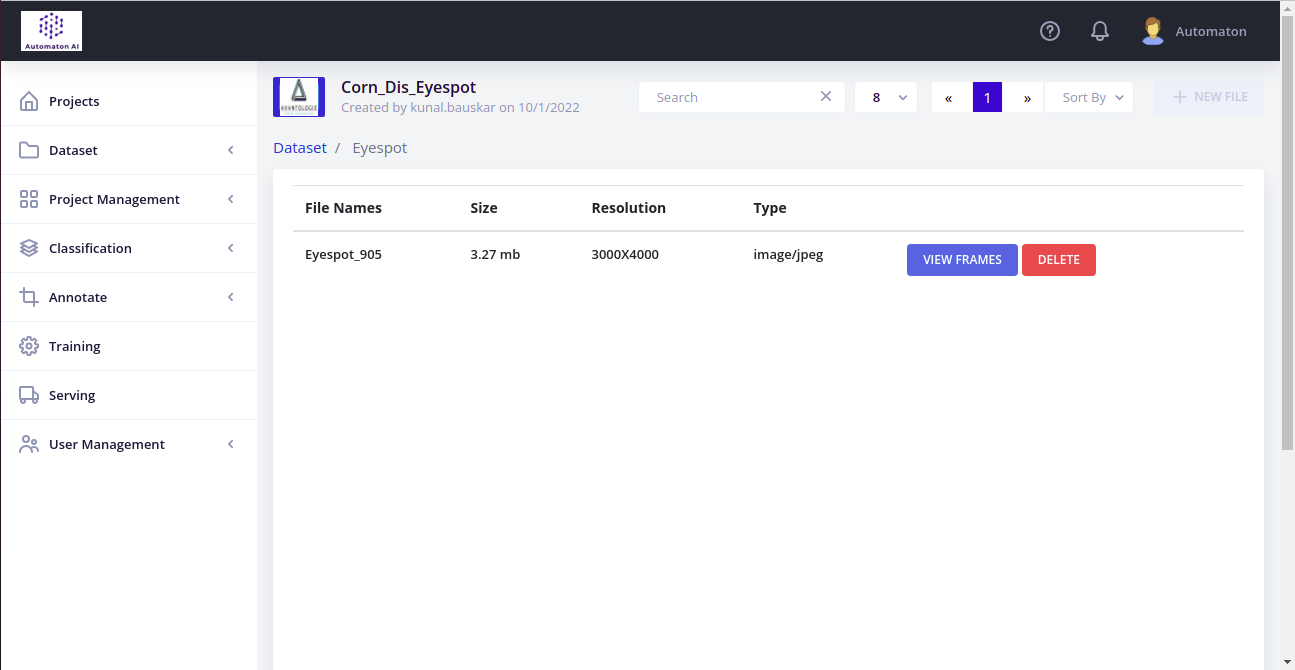
- The Columns in the table are as follows:
- Name – Displays the Name of the image
- Size – Image size in MB (megabyte)
- Resolution – Pixel values in Width X Height.
- Type – Specifies format of the image.
- Users can quickly visualize images in the dataset by clicking on the 'View Frames' button.
- The 'Delete' button deletes the selected file
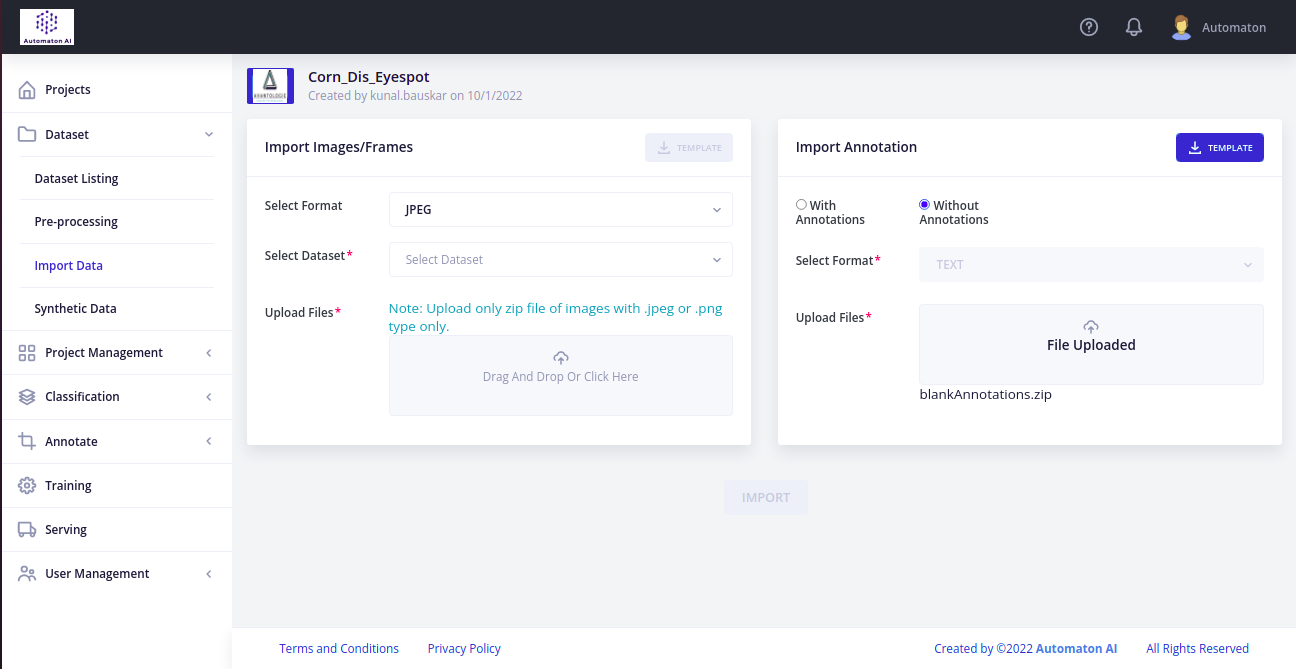
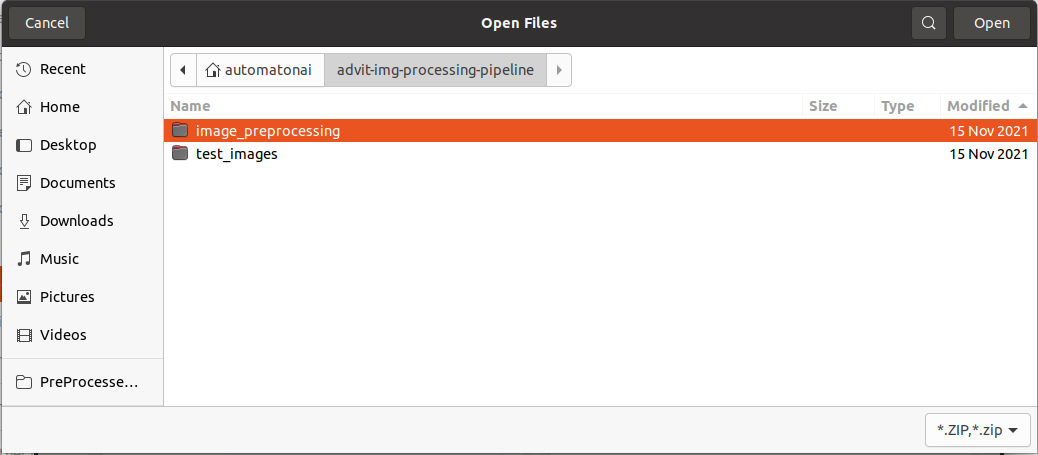
- First, select your preferred image format from the 'Select Format' dropdown list of values.
- Select the dataset in which you want to upload your images. If the dataset does not exist, Create One.
- Upload the .zip file which contains your set of Images.
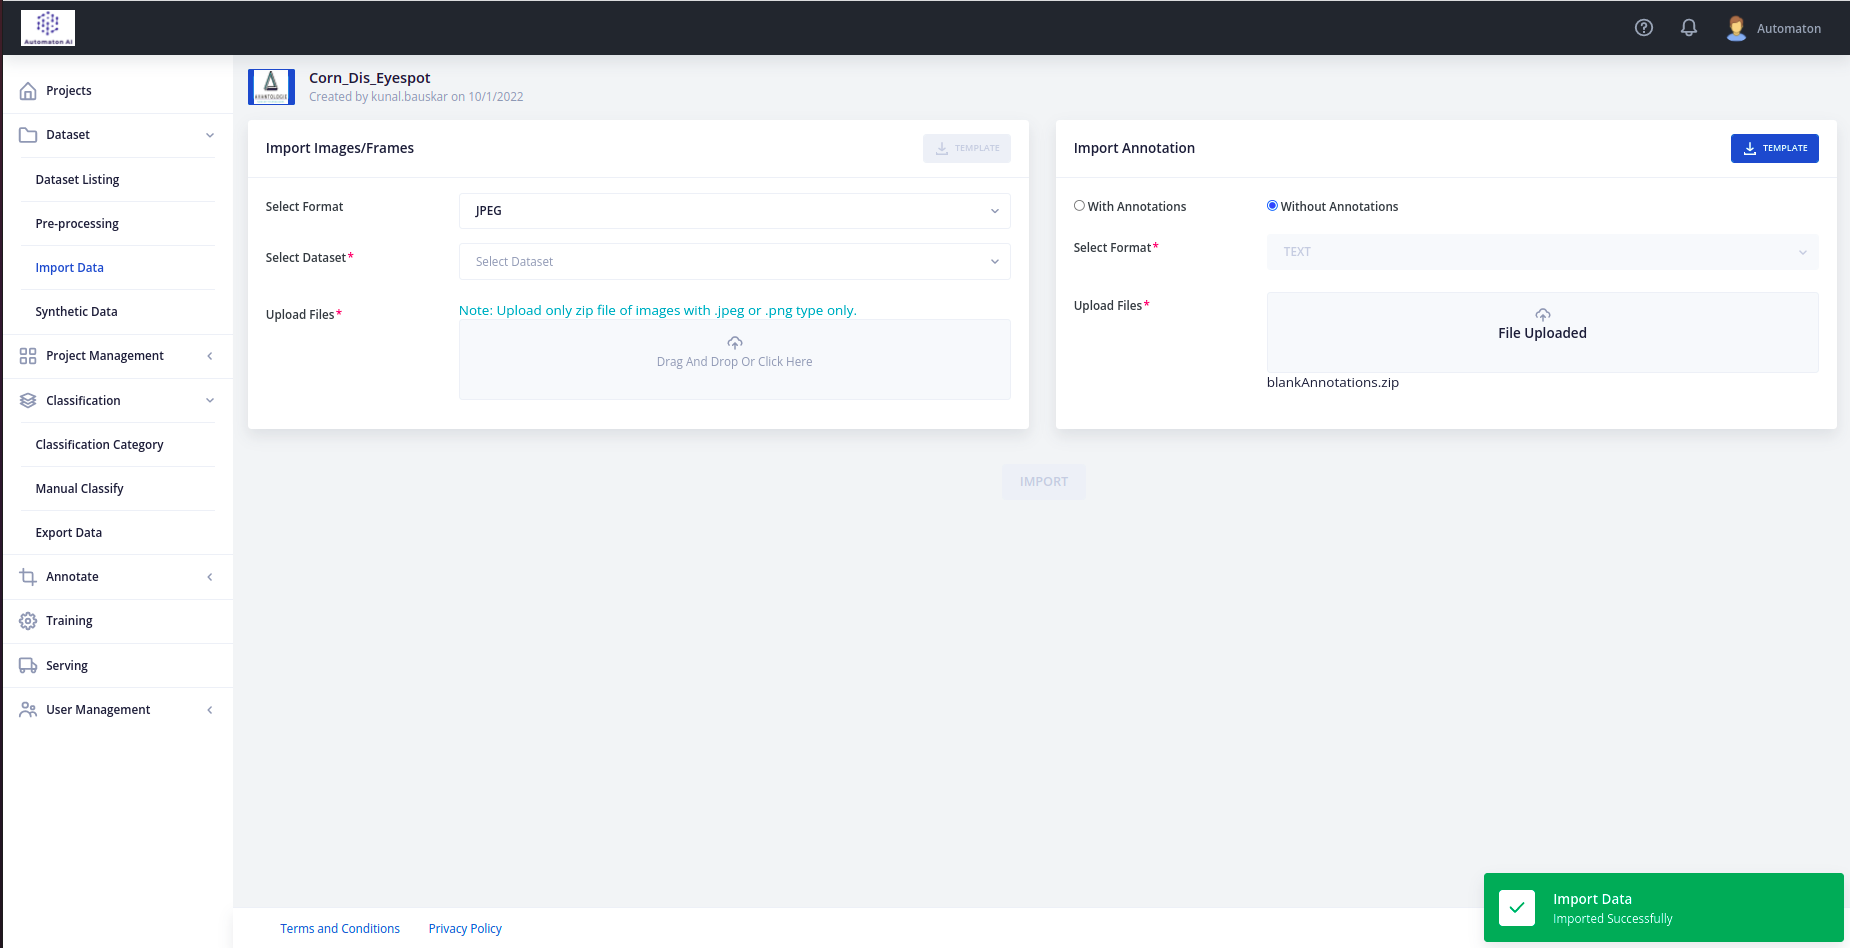
- Select your preferred annotation format from the 'Select Format' dropdown List.
- Upload the .zip file which contains annotation files of respective images as well as the categories.txt file.
- Click on the 'Import' button and wait for a few seconds till the 'Imported Successfully', once done a success message appears as shown below
- Select the dataset in which you want to upload the video under the dataset listing tab.
- Once you select/create a new dataset, click on the view button available on the respective dataset.
- In the top right corner of the screen, click on New File and a new window will open
- Enter the file name as requested and upload the file by either dropping or browsing your respective device and click on Save.
If you want to annotate data for a new category, categories can be added at runtime.

- To add a category/class click on the '+' icon
- Enter the name of the new category and save.
E.g., Root canal
- Once the desired category is created, you can now add attributes to each category by clicking on the + icon in front of the attributes tab.
For e.g. :-- Root canal Obturation.
- Attributes can have various values.
For e.g. - Root Perforation, Broken Instrument.
- These categories can be used while the annotation is carried out.
- Add, Edit, or delete a category or attribute can be done at any point in time.

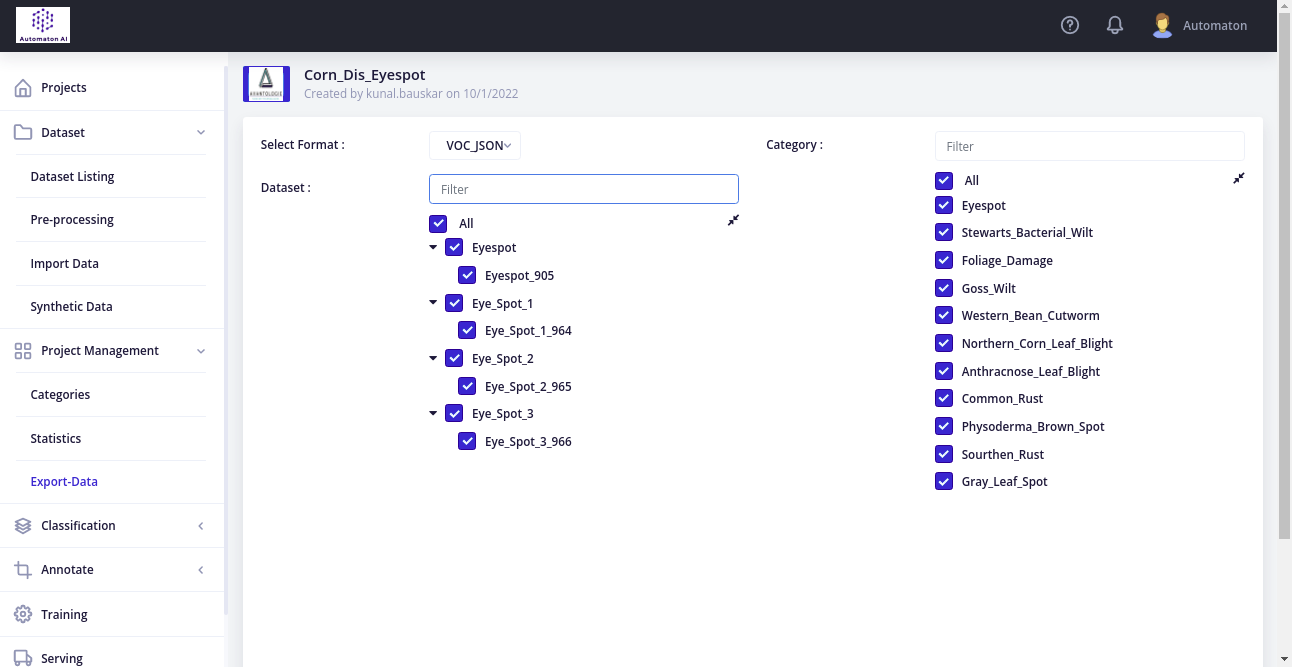
When you have annotated all the images, you are ready to export your Annotations. Select your desired output format and click 'Export', To export, click on the 'Export Annotation' button on the bottom-right of the page
- Under the Classification tab, click on Classification Category to view all the categories.
- To add a new category, click on the new category button in the top right corner.
- Once you add the category, add the relevant attribute required for that particular category and click on the save icon.
- Select the respective images or choose the select all option to add the relevant attribute to your dataset.
- Select the relevant attribute for the images selected.
- Once done, click on save each time you are classifying the images.
- To export the classification data, click on the create new filter button in the top right corner.
- Enter the filename, category and select the respective dataset and finally save. The required data will be exported to your local device.
- Once the process is complete, you will be notified via a 'Successful' message.
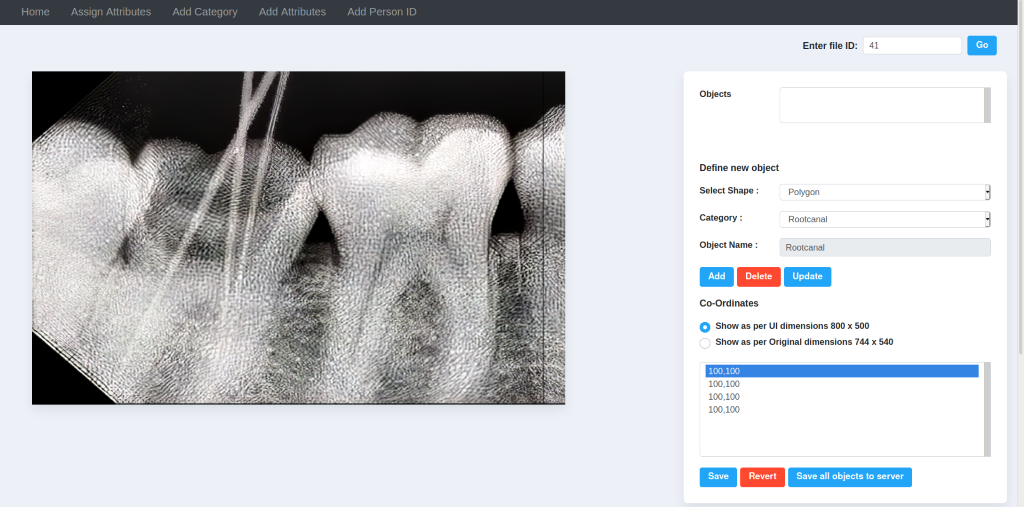
The Instructions for Annotating an image is given as follows:
- Enter the file ID in the ‘Enter file ID’ box and click on the ‘Go’ button.
- Select the desired annotation shape from the ‘Select Shape’ Dropdown list.
- Choose the category from the ‘Category’ Dropdown list and If you feel like adding new categories to the dataset go to the ‘Category Page’ from ADVIT Menu and follow the given steps.
- Click on the ‘Add’ button and start annotating the object from the image.
- After Annotating the object, click on the ‘Save’ button to Save the annotated object

- The Annotation will be featured in the image as Shown Above.
- The ‘Delete’ button is utilized to Delete the Annotation.
- The ‘Update’ button will Update the Annotation on basis of ‘Category’ and ‘Shape’.
- The Co-Ordinates Column records the annotation points of the Coordinates and lists accordingly. You can delete the co-ordinate points and redo annotation.
- Finally, click on the ‘Save all objects to server’ Button which will save all the annotated objects from the image to the server and will go to the next image for annotation.

This tutorial demonstrates how automated data-labeling using Machine Learning (ML) models can be configured onto your system using the ADVIT UI / API. With automated data-labeling, you can use model predictions to label your inputs. Automated data-labeling can help you to prepare training data, or assign other useful labels and metadata to your inputs. Since models are doing most of the work of annotating your data, this enables you to speed up and scale up your annotation process while ensuring quality standards, typically reducing the human effort of labelling data by orders of magnitude. This process is built into our APIs and it seamlessly integrates with all the functionality of the ADVIT platform.
- Man, Woman detection
- Adult detection
- Child detection
- Face detection
- Facial sentiment analysis
- Man-Woman Classification and Detection Model:
- Content: Identify men and women in real-time data such as photo or video data. The AI model returns two classes: "Man" and "Woman" along with bounding boxes in PASCAL VOC, YOLO txt, or COCO JSON format along with its probability scores.
- Use Case:
- Surveillance System
- Effective Retail Analytics
- Population Statistics and Prediction
- Mobile Application and Video Games to Improve user experience based on gender Information
- Face Detection Models:
- Content: Face plays a significant role in social engagement for delivering on the personality and sensations of an individual. People cannot recognize unexpected appearances of faces in comparison to machines. The automatic face identification framework does a significant job in face recognition, facial expression recognition, human-computer interaction, etc. Face detection is a computer vision technology that determines the location and size of a human face in real-time data such as photo and video data.
- Use Case:
- Unlocking mobile phones
- Find missing persons
- Aid forensic investigations
- Identify people on social media platforms
- Diagnose facial diseases
- Tracking school, colleges, employee attendance
- Facilitate secured transactions.
- Validate identity at ATM
- Control access to sensitive areas
- Identify the age of an individual
- Facial Expression Recognition Model:
- Content: recognizing emotion from pictures is now becoming an important part of the image and in applications based processing human-computer interaction. Automatic facial expression recognition systems have many applications including, human behavior understanding, detection of mental disorders, and synthetic human expressions. AI models have been used with images and videos for displaying facial emotions including happiness, sadness, anger, surprise, disgust, and fear.
- Use Case:
- Automatic tagging for movie genres like thriller, comedy, romance
- Retail Analytics
- Extracting data about crowds at public events
- Predict actions based on facial expressions.
- Root canal Detection Model:
- Content: artificial intelligence (AI), represented by deep learning, can be utilized for real-life problems and is applied across all areas of society including the clinical and dental fields. AI models can be used to detect root canal in teeth from digitalized dental X-Ray images for clinical quality improvement. To support dentists to make clinical decisions, we propose an AI model for automated clinical quality evaluation.
- Use Case:
- Detection of Root canal in Dental X-Ray images
- People and Vehicle Model:
- Content: Pedestrian and vehicle detection by autonomous cars is an emerging area of research in the automotive community. The AI model can be used to detect people and different vehicles in real-time data such as photo and video data. This is required to make efficacious real-time decisions to avert imminent collisions with vulnerable traffic users such as humans, stranded or moving vehicles, cyclists, or other static obstacles.
- Use Case:
- Surveillance of vehicles in real-time
- Vehicle statistics in a specific location
- Traffic Analysis
- Multi Class Classification:
- Content: This model has widest range of categories comprising of:
Person, Bicycle, Car, Motorcycle, Airplane, Bus, Train, Truck, Boat, Traffic Light, Fire Hydrant, Stop Sign, Parking Meter, Bench, Bird, Cat, Dog, Horse, Sheep, Cow, Elephant, Bear, Zebra, Giraffe, Backpack, Umbrella, Handbag, Tie, Suitcase, Frisbee, Skis, Snowboard, Sports Ball, Kite, Baseball Bat, Baseball Glove, Skateboard, Surfboard, Tennis Racket, Bottle, Wine Glass, Cup, Fork, Knife, Spoon, Bowl, Banana, Apple, Sandwich, Orange, Broccoli, Carrot, Hot Dog, Pizza, Donut, Cake, Chair, Couch, Potted Plant, Bed, Dining Table, Toilet, Tv, Laptop, Mouse, Remote, Keyboard, Cell Phone, Microwave, Oven, Toaster, Sink, Refrigerator, Book, Clock, Vase, Scissors, Teddy Bear, Hair Drier, Toothbrush
- Content: This model has widest range of categories comprising of:
- First, select the project from the Projects dashboard, to begin with, the process of auto polygon annotation.
- To execute this functionality, you need to select the dataset you wish to work on. Select the required dataset from the Dataset Listing tab under the Dataset section.
- If you haven’t added a dataset, click on the Import Data tab under Dataset to add the respective dataset.
- Select the respective format in which the frames are available.
- Add or Select a Dataset to which these frames should be added.
- Drag and drop or click on the upload files box to navigate the required frames on your local system.
- Only Zip files of images will be accepted by ADVIT.
- Once you select the Zip file, click on Import to add the required dataset.
- Once uploading is complete, you will receive a message saying “Import Data imported successfully”
- For annotation to take place, you need to add the categories and attributes as per requirement. Under Project Management click on the categories tab.
- By clicking on the “+” sign, you can add categories and attributes as required. For attributes within a particular category, first, select the category in which you want to add the attributes and then click on the “+” sign in front of Attributes.
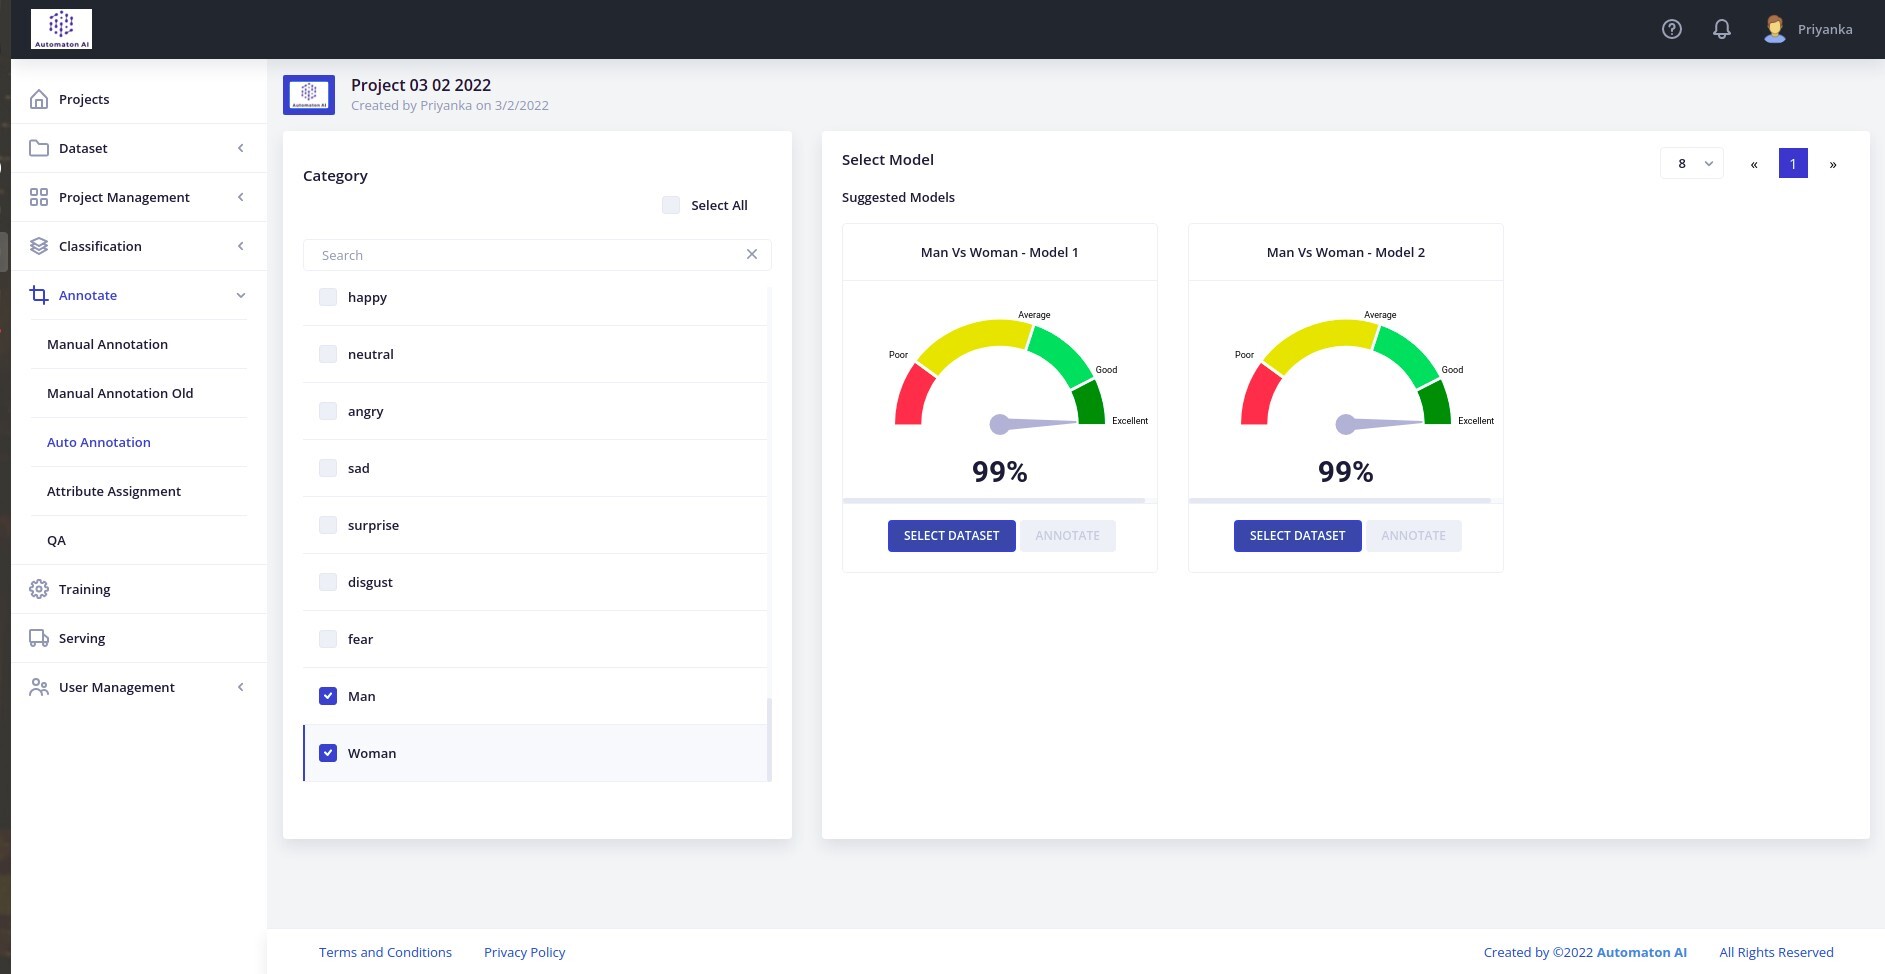
- Click on the Auto Annotation tab under the Annotate section.
- For the process to begin, you need to select the categories for which the annotation should be carried out.
- On selecting single/multiple categories as required, ADVIT will list suggested models suitable for such annotation.
- Click on the model as per the project requirement and select the dataset by clicking on the highlighted button.
- To begin Auto Annotations, click on the Annotate button on the respective model.
- For further insights on the annotation, you can jump to the Statistics page under the Project Management tab.
- You can also manually verify the annotations made by going through the frames from the Manual Annotations page.
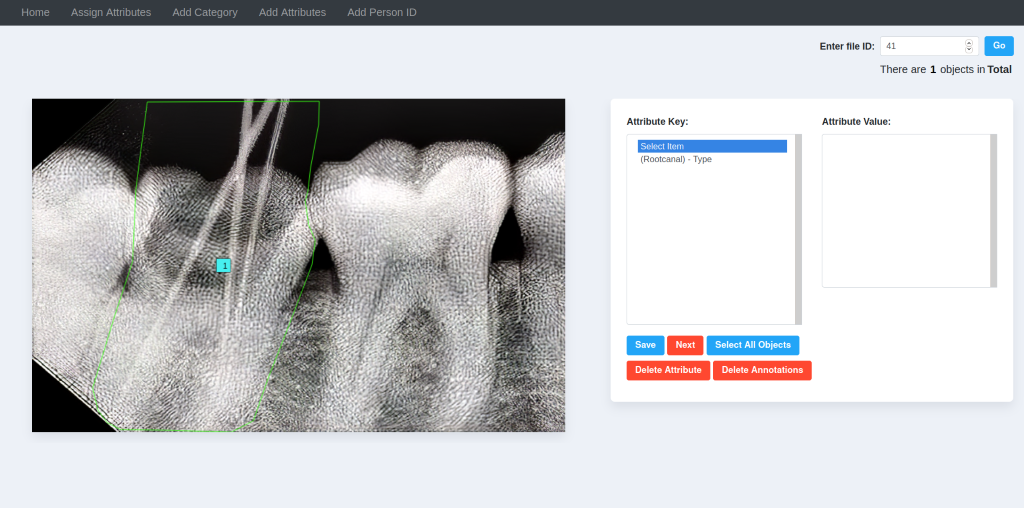
- Enter the desired file ID in the ‘Enter File ID’ box and click on the ‘Go’ Button.
- Below, you can get the Statistics of Attributes assigned as well as Attributes yet to be assigned with ‘Attribute Key’.

- For Assignment of Attribute, Select the Annotation from the image.
- ‘Attribute Key column shows you a list of Attributes. Select the Attribute from the list.
- ‘Attribute Value’ column shows you a list of Attribute Values. Select the Value among them or Select the ‘CD’ value if you cannot define an attribute to the Annotation.
- Click on the ‘Save’ Button and the Attribute value will be assigned to the annotation shown in the below image.
- Under the Training tab, click on “New Model” present in the top right corner of your page.
- Now you can create an entirely new model by selecting the respective option.
- On the New Model page, enter the Model Name, Version, Model type as per your requirement for maintaining versions of your model.
- Based on the Model type (Object detection, classification, and key point), you will now have to select the Model from the available options in the dropdown menu.
- Select the required Framework type, version, and dataset format you are going to work on.
- Select either GPU or custom hardware, whichever suits your computational requirement.
- You can fine-tune hyperparameters/parameters as per your model requirement by clicking on the respective button and entering the values.
- Enter the image size, and finally select the dataset and categories you want to work on.
- You can add comments to your model if required.
- Once you click save, you will be directed to a new page that shows the summary of the models you have worked on.
- By clicking on “View Model Details”, you will be directed to a new page that summarizes the model details.
- Once you review all the details, you can start the training by clicking the “Start Training” button highlighted on the model summary page.
- You will be notified with a message in the bottom right portion of your screen mentioning that the training has started.
- Under Training, first, add a model to serve by clicking on “New Model” in the top right corner and selecting the model to be trained. Choose from either a new model or transfer learning. Enter the parameters as required and click on save.
- On the model summary page, click on the download inference docker button for the respective model.
- The browser will automatically download the Zip file.
- Once you extract the file, you will be able to see all the required files that should be in the docker file.
- Under the Training tab, click on “New Model” in the top right corner of the screen.
- Select “Entirely new model” and you will be directed to a new screen. Enter the details as requested.
- For Model Type, select Object Detection and Mini Exception in the drop-down list below.
- Fill in the rest of the data as per your requirement. You can also set the Hyperparameters by clicking on the respective box and set different values for different parameters like Epoch, Batch size, Decay, etc.
- Select the dataset and categories you want to work on and click on Save.
- Anaconda
- Open Anaconda Prompt from the search bar.
- Navigate to the “ADVIT_inference_api” file.
>cd models\research\object_detection\advit_inference_api - Now activate the Conda environment.
>conda activate tfod - >python infer.py
- You will be asked to enter your ADVIT login credentials: Username and Password.
- Once verified, the project list will be displayed. Enter the project you wish to work on.
- Now you will be asked to select the dataset from the list you want to annotate on.
- Finally, select the file (video) on which the annotations should be carried out on.
- Through this process, your custom model will be integrated and annotation will be carried out.
- You can view the results either by reviewing the statistics from the Project Management tab or manually observing the annotations through the Manual Annotation page available.
- While the model trains, you can review training statistics on the model details page. This button will be present under the Model Losses section in the bottom right of the screen.
- The statistics will update in real-time and you can refresh to get the latest reports.
- When training is completed, a “success” message will be displayed on the Model summary page under the Model you were working on.
- To continue working on the model, you can also create a new version by simply clicking on “New Version”, displayed above the respective model on the model summary page.
- The Model Summary page will display all the versions of the model and you can monitor the versions and also compare them.
- Users can compare the learning rate, regression loss, classification loss, learning rate Decay, mAP, etc for multiple versions of the same model.
- Click on the “Evaluate” button under the respective model which needs to be evaluated.
- Select the weight and upload a Zip file of the image/images you want to test the model on.
- A Zip file will be downloaded automatically by your system and you can evaluate the results by extracting the respective file.
- Under the Training section, click on the Compare button for the respective set of model versions you wish to compare.
- You will be directed to a new page where you get the comparison in a tabular format with the characteristics mentioned above.

When your project is first deployed, a default Admin account is created with login credentials that give you full administrative access. As a best practice, you should create another user account with full Administrator access. That way, you can use one account for your everyday administrative activities and reserve the other as a “Super Admin” account. This can be helpful if you forget your regular credentials, or they somehowbecome unusable.
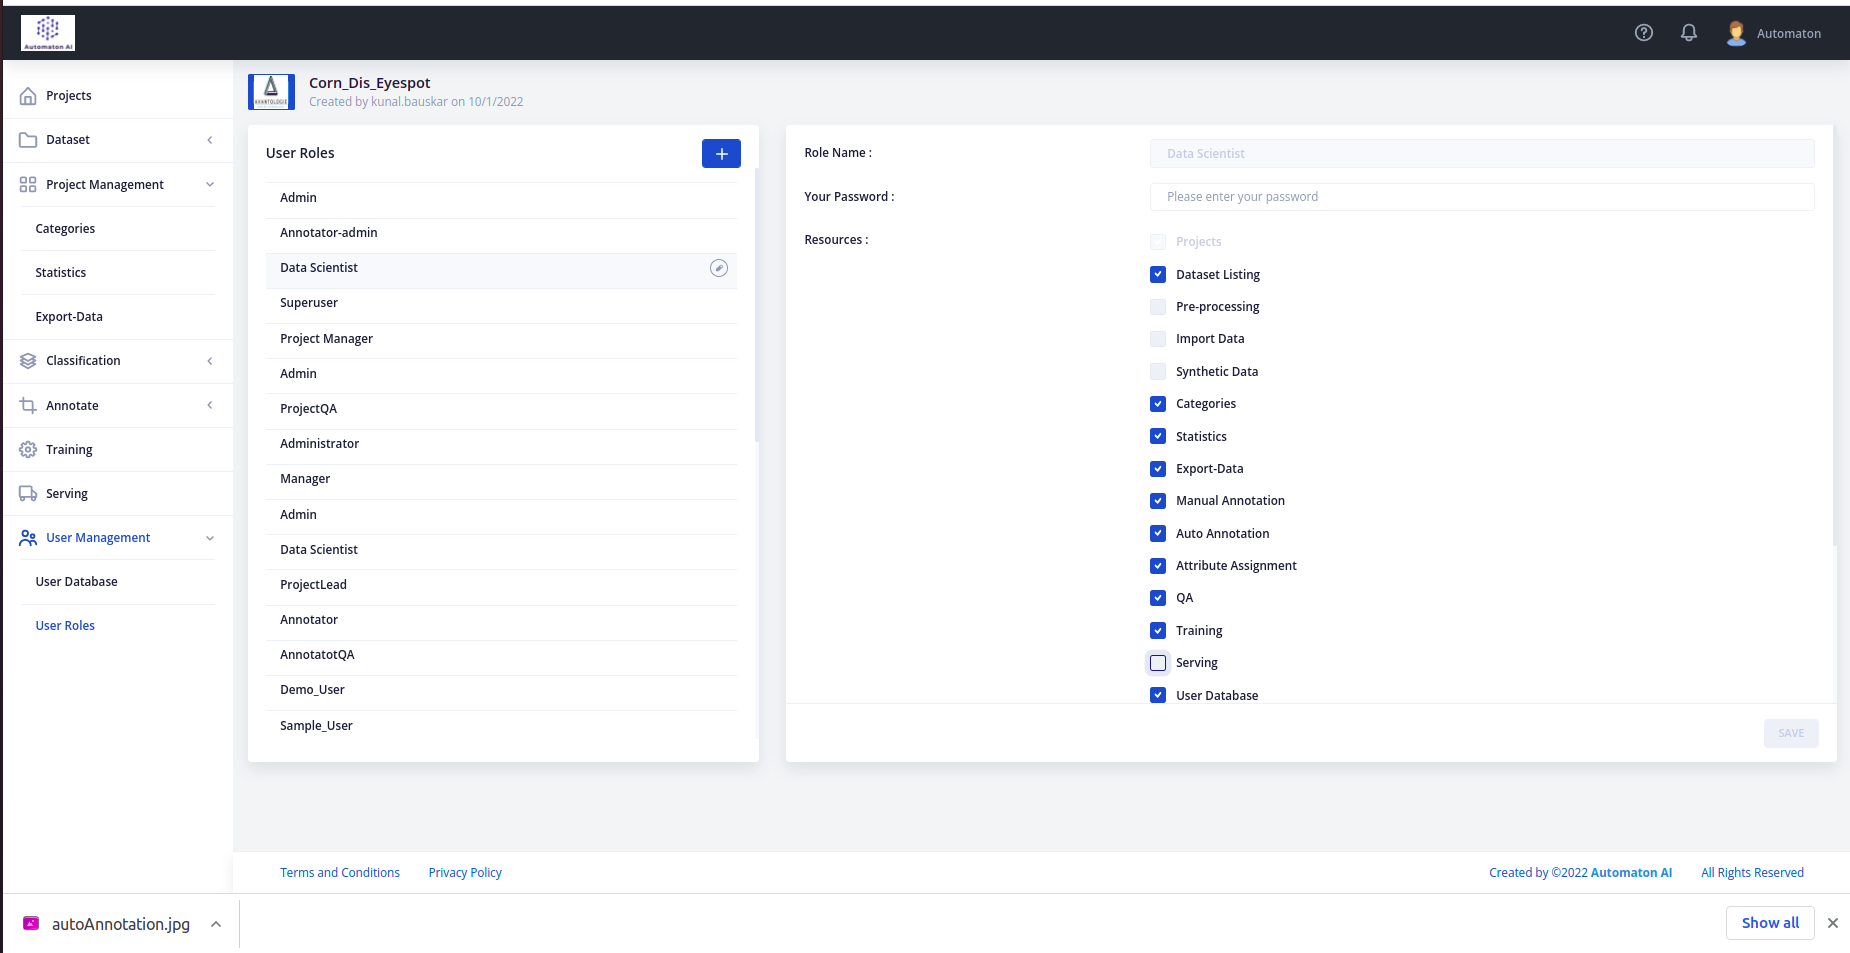
If there are others on your team or service providers who need access, you can create a separate user account for each and assign restricted access based on their role. To limit the modules that users can access when they login to ADVIT, you must first create a role with limited scope and only the necessary resources selected. Then, you can assign the role to a specific user account. Admin users who are assigned to a restricted role can seeand change data only for associated modules, but cannot make changes to any global settings or data.
- Super Admin
- Admin
- Automaton AI user
- Annotator
- Project Lead
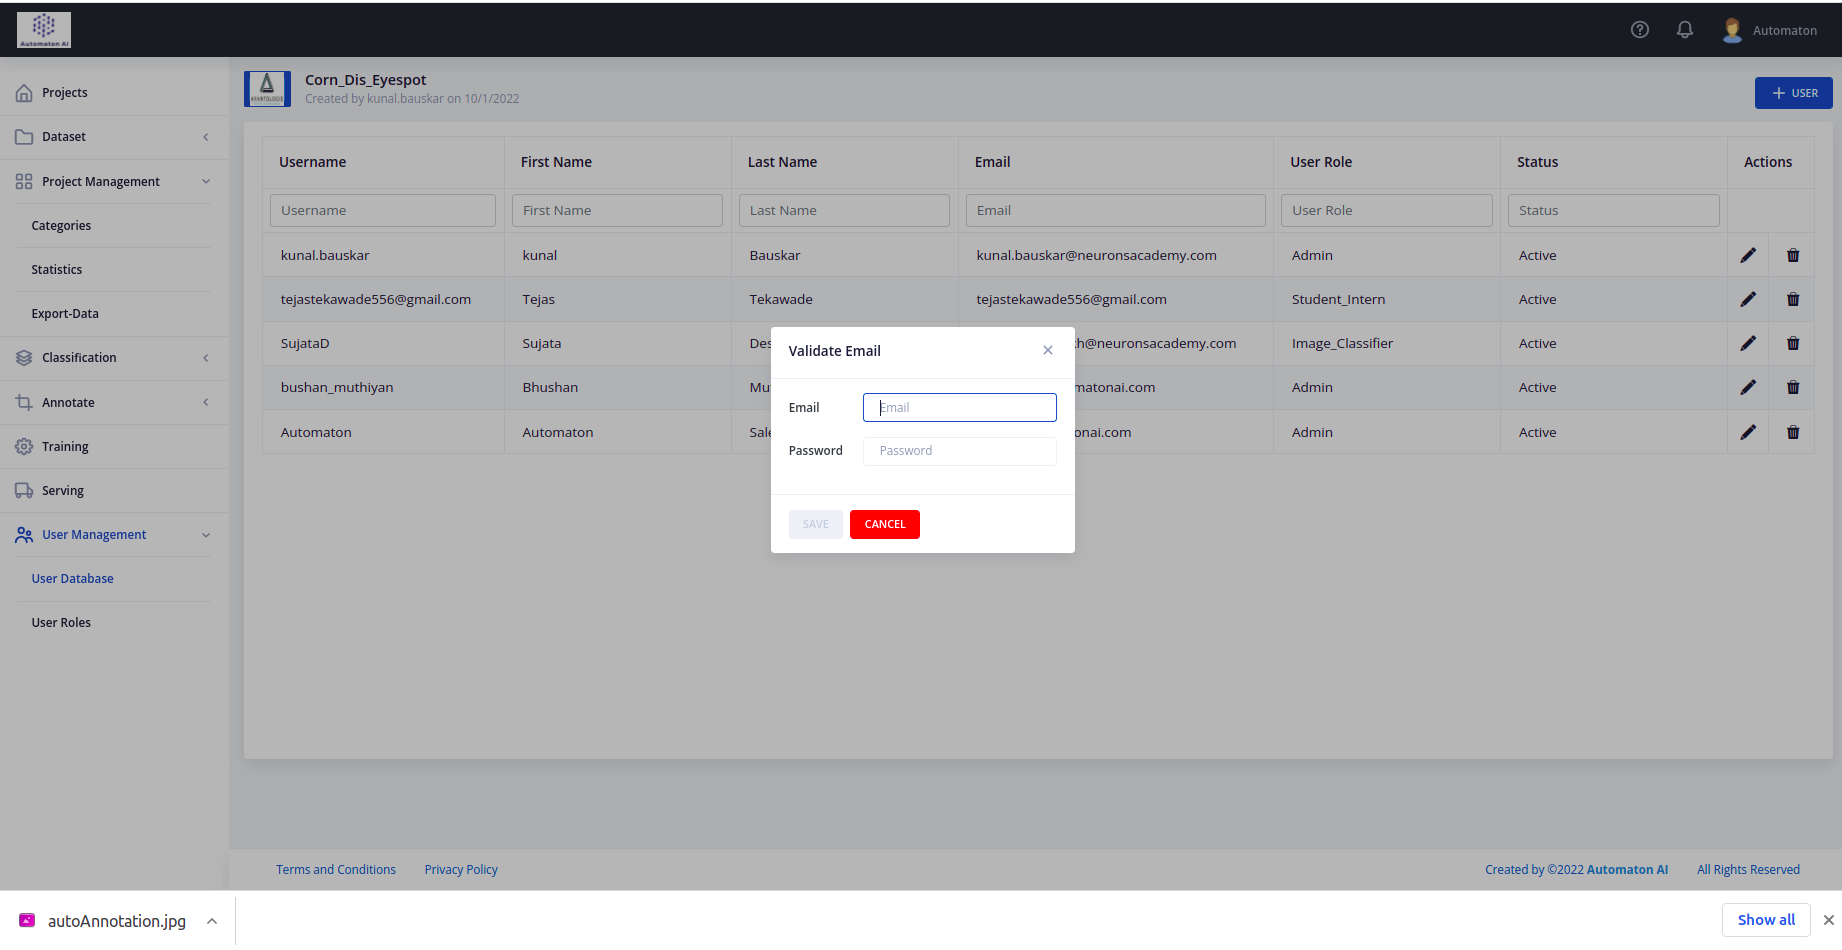
- On the Admin, the sidebar goes to System > User Database.
- In the upper-right corner, click Add New User.
- To edit an existing user, click a username in the grid. You can modify the User Info and User Role sections as needed.
-
In the Account Information section, do the following.
- Enter the User Name for the account.
- The User Name should be easy to remember. It is not case-sensitive. For example, if your username is John, you can also log in as john.
-
-
Complete the following information:
- First Name
- Last Name
- Email address
- Each user account must have a unique email address.
- Enter a password for the account. For Password Confirmation, re-enter the password to make sure it was entered correctly.
- Set this Account as Active.
- Under Current User Identity Verification, enter your user account password.
- In the left panel, click User Role. The grid lists all the existing user roles. For a new project, Administrators are the only role available.
- In the Assigned column, select a user role. You can view existing or define additional user roles. After a role is defined, you must edit the user account to assign the new role.
The shortcuts ease the process of annotation as well has helps in quality check of the annotations.
| Key | Description |
|---|---|
| a | To add a node after current node, while using polygon annotation. |
| b | To show all annotated objects on screen |
| d | To Delete the current / selected node |
| D | To Delete the current / selected object |
| e | To save point locally on browser |
| h | To fade background |
| m | To move current / selected node in any direction and not doesn’t maintain shape of rectangle |
| M | To Move current / node and adjust other nodes to as per its axis to maintain shape of rectangle |
| n | To tavel through nodes and go to next node |
| N | To tavel through nodes and go to previous node |
| q | To load and go to previous image |
| s | To save all objects to the server |
| S | To Shift or move whole shape. |
| w | To load and go to next image |
| x | To show / hide the reference axis on screen |
| z | To add object with current selected category |
| u | To update and load next image according to presence of objects. (if object is present for 1st image and 20th image then after pressing ‘u’ while being on 1st image it will load 20th image instead of 2nd one) |
| y | To update and load previous image according to presence of objects. (if object is present for 1st image and 20th image then after pressing ‘y’ while being on 20th image it will load 1st image instead of 19th one) |